
how to make Quilted Coasters

Quilting is one of those hobbies that can be terrifying to a new crafter. When you look at a quilt, all you see are perfect corners and mesmerizing patterns, and it seems like there is absolutely no room for error.
Quilted coasters are an amazing intro to quilting. It’s all the fun of matching up triangles and making fun patterns, without the stress of creating a giant quilt top. I’m all about a low-commitment craft. The best part? You can make these quilted coasters entirely by hand.
In this quilted coaster tutorial, we’re going to walk through step-by-step on how to create a mini quilt top, and how to add a backing.
quilted coaster materials
sewing machine or sewing needle
thread
iron and ironing board
ruler
scissors or rotary cutter
scrap fabric in coordinating colors
cardstock
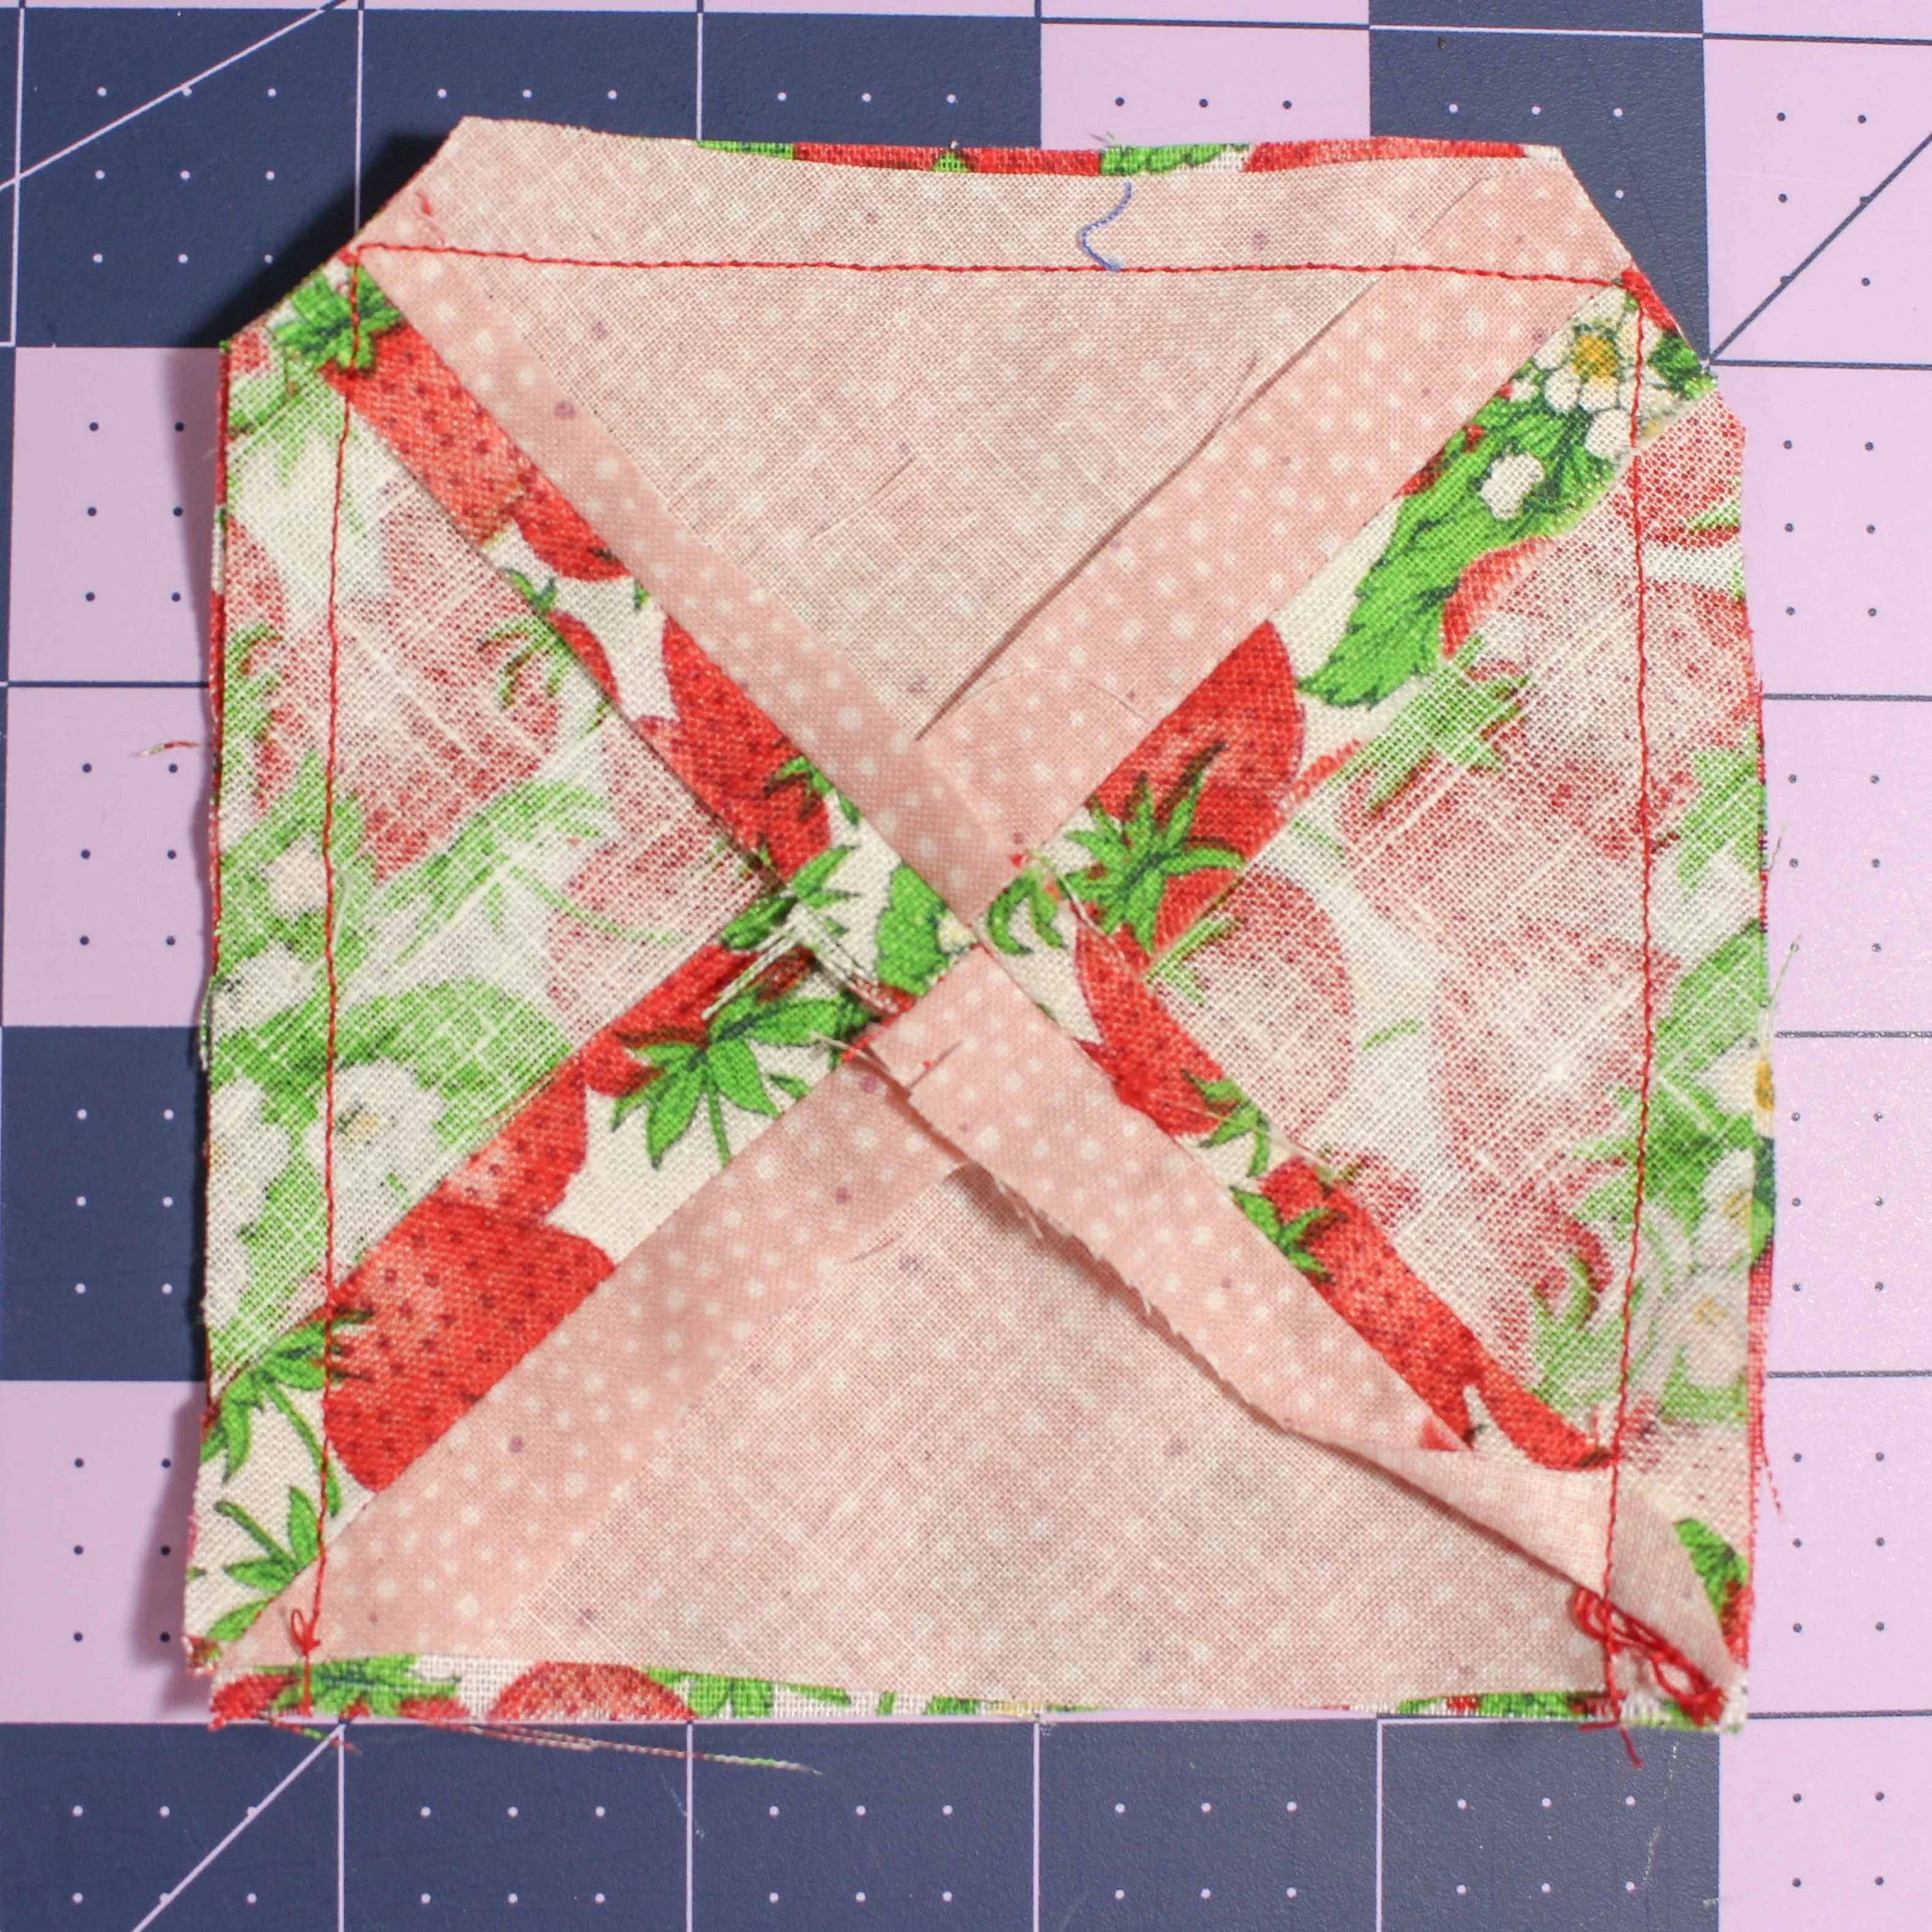
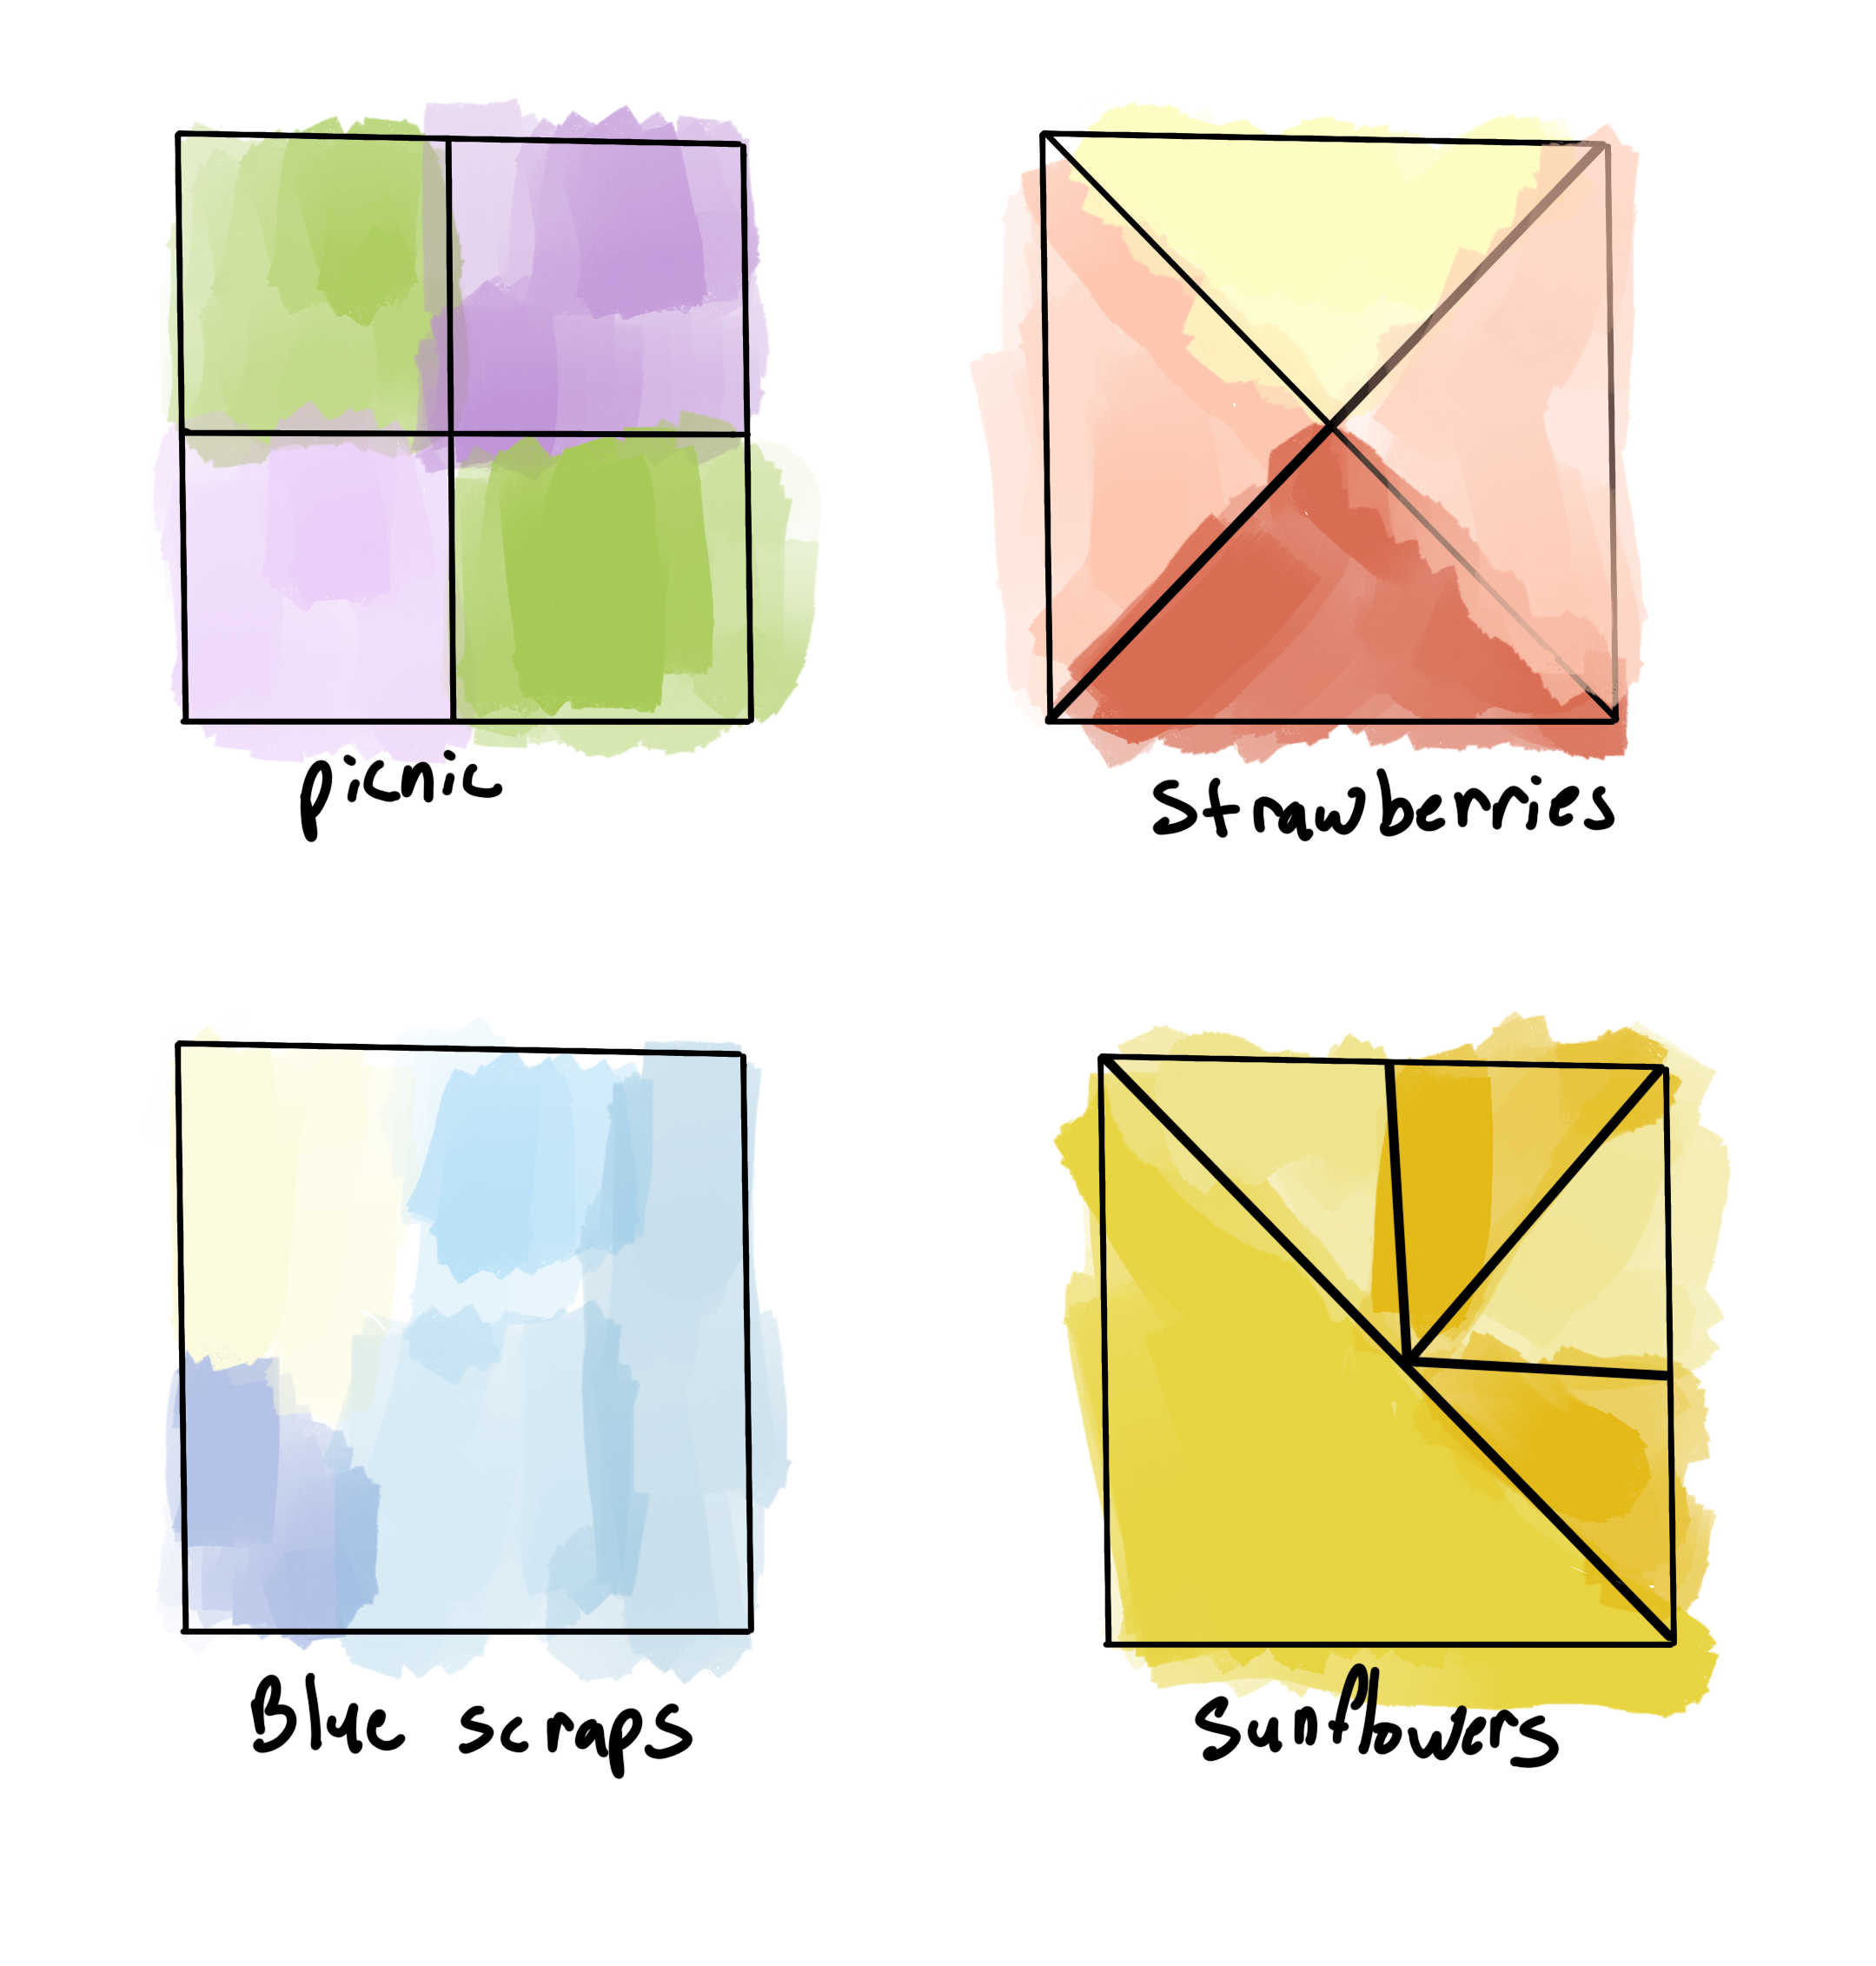
strawberry quilted coaster
cutting instructions

tip: when cutting out the triangles, start with a square and then cut it down the diagonal center. That way, you don’t have to deal with measuring perfect triangles.
Requirements: two fabric colors
One backing piece (color 1): 4.5” x 4.5” square
Two triangles (color 1): measuring 3.75” on the short side, and 5.5” on the hypotenuse (never thought I would need to use that word past 10th grade Geometry).
Two triangles (color 2): measuring 3.75” on the short side, and 5.5” on the hypotenuse.
tutorial
The Strawberry Quilt Coaster has 5 pieces total — four triangles and one square. The triangles will make up the front of the quilt, and the square will be the backing.

First, match one of each color triangle along the short side of the triangle. You want the vibrant side of the fabrics (the right side) to be touching. Do this again with the other two triangles. Pin together so they don’t shift while sewing.

Sew along the short side of the triangle with 0.5” seam allowance.

Press open your seams. You should now have two larger triangles, each made up of two smaller triangles.

With right sides together, pin together the two larger triangles along the hypotenuse (the longer edge of the triangles).
Sew together along the hypotenuse with 0.5” seam allowance. Press open your seam. Now, you should have a square.

With right sides together, pin your quilted square to the backing square. Sew along all four sides with 0.25” seam allowance, leaving a 1.5” gap along one edge.

Clip all four corners. This will help make our corners sharp when we turn the coaster right side out.
Using that gap, flip your coaster so that the right side is facing out. Tip: use a pencil tip to poke the corners out from the inside. It makes them look sharper!
Press the coaster, making sure to line up the 1.5” gap so it looks clean.

Sew the gap as close to the edge as possible. Press one final time, and you’re done!
sunflower quilted coaster
cutting instructions

Requirements: three fabric colors
One backing piece: (color 1): 4.5” x 4.5” square
One triangle (color 1): measuring 5.5” on the short sides, and 7.75” on the hypotenuse.
Two triangles (color 2): measuring 3.25” on the short sides, and 4.5” on the hypotenuse.
Two triangles (color 3): measuring 3.25” on the short sides, and 4.5” on the hypotenuse.
tutorial
The Sunflower Quilt Coaster has six pieces total — four small triangles, one large triangle, and one square. The triangles will make up the quilt front of the coaster, and the square will be the backing.

First we’re going to sew together the four small triangles. Start by matching up two opposite color triangles together, and sew together using a 0.5” seam allowance. along one short side. Repeat with the second set of small triangles. You will have two medium sized triangles, each made up of two smaller triangles.

Press open both triangles along the seam, pressing the raw edges to opposite sides so they lay flat. You will be repeating this step every time you sew a seam.

Sew together the two medium sized triangles along one of the short sides, again matching up opposite colors. You should have one large triangle that is equal in size to your remaining pattern piece. Press open the large triangle, pressing the raw edges to opposite sides so that they lay flat.


Sew together the two long triangles along the hypotenuse. You should now have a square. Press open the square, making sure all the seams are laying flat before completing the next step.

Match up your quilt front with the backing square. Sew the squares together with 0.25” seam allowance, leaving open a 1” gap. This gap makes it possible to flip the quilted coaster right side out, so that the pretty quilt front faces the outside.

Clip all four corners. This will help make your corners sharp when you flip the coaster right side out, without fabric bunching up in the corners.

Using the 1” gap, flip your coaster so that the right side is facing out. Tip: use a pencil tip to poke the corners out from the inside. It makes them look sharper!
Press the coaster, making sure to line up the 1” gap so it looks clean.

Sew the gap as close to the edge as possible. Press one final time, and you’re done!
picnic quilted coaster
cutting instructions
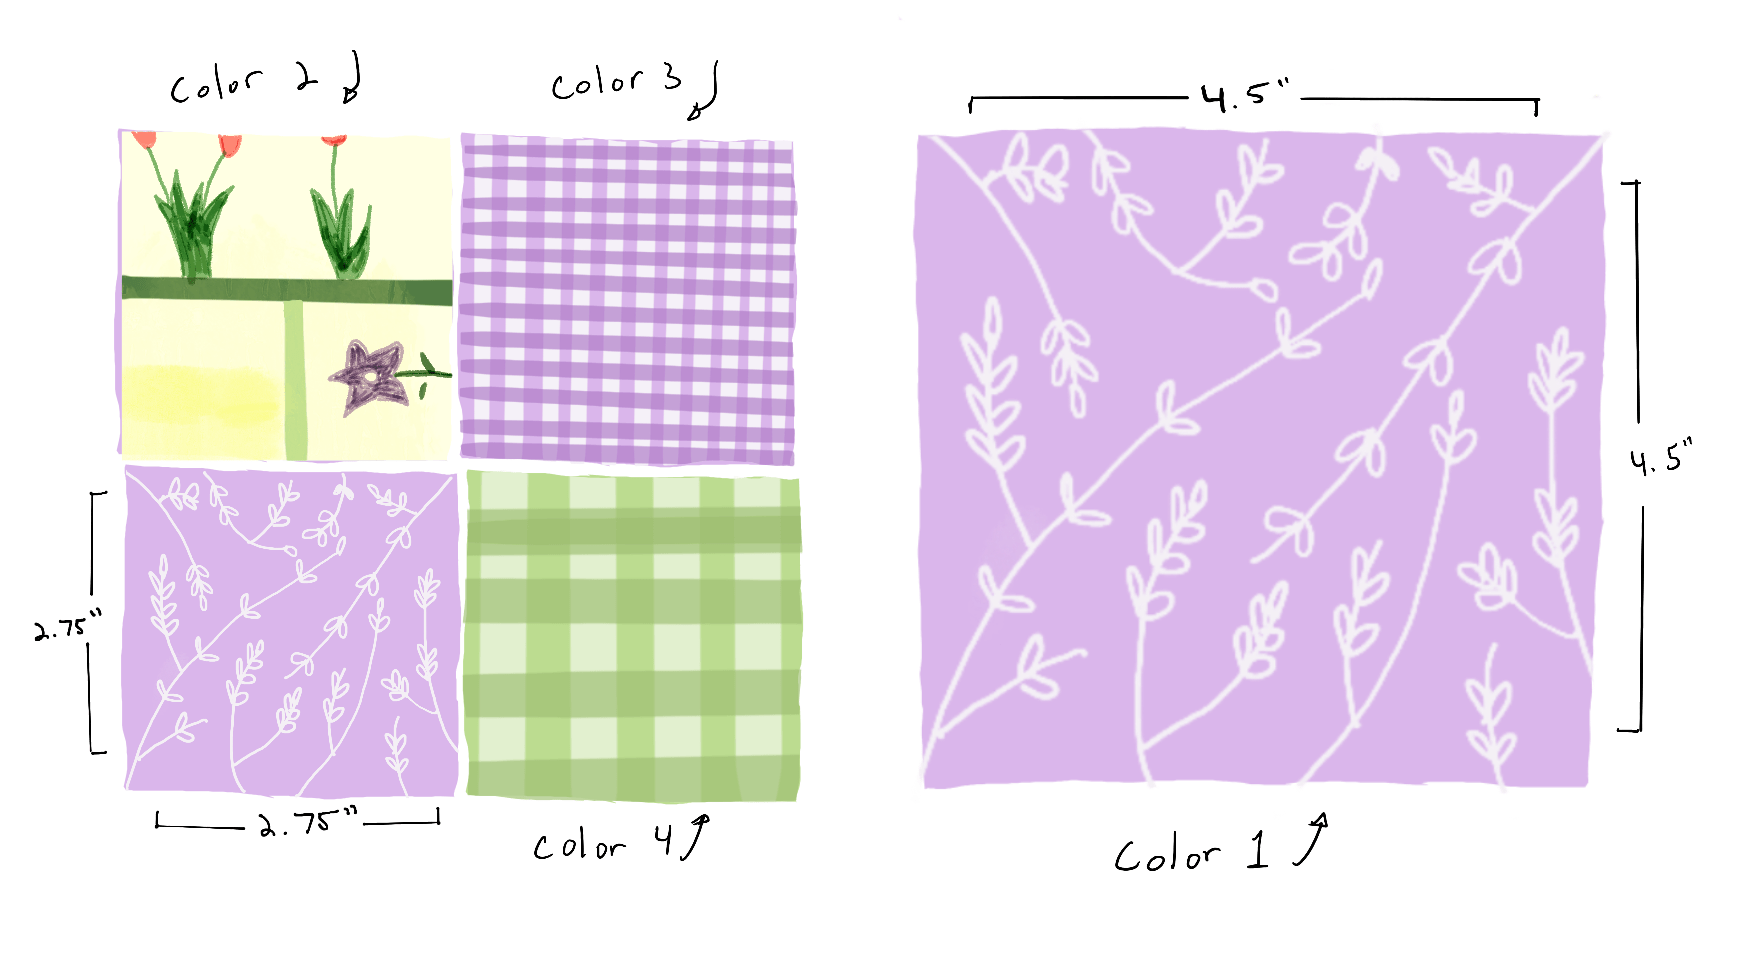
Requirements: two fabric colors
One backing piece (color 1): 4.5” x 4.5” square
Two squares (color 1): 2.75” x 2.75”
Two squares (color 2): 2.75” x 2.75”
tutorial

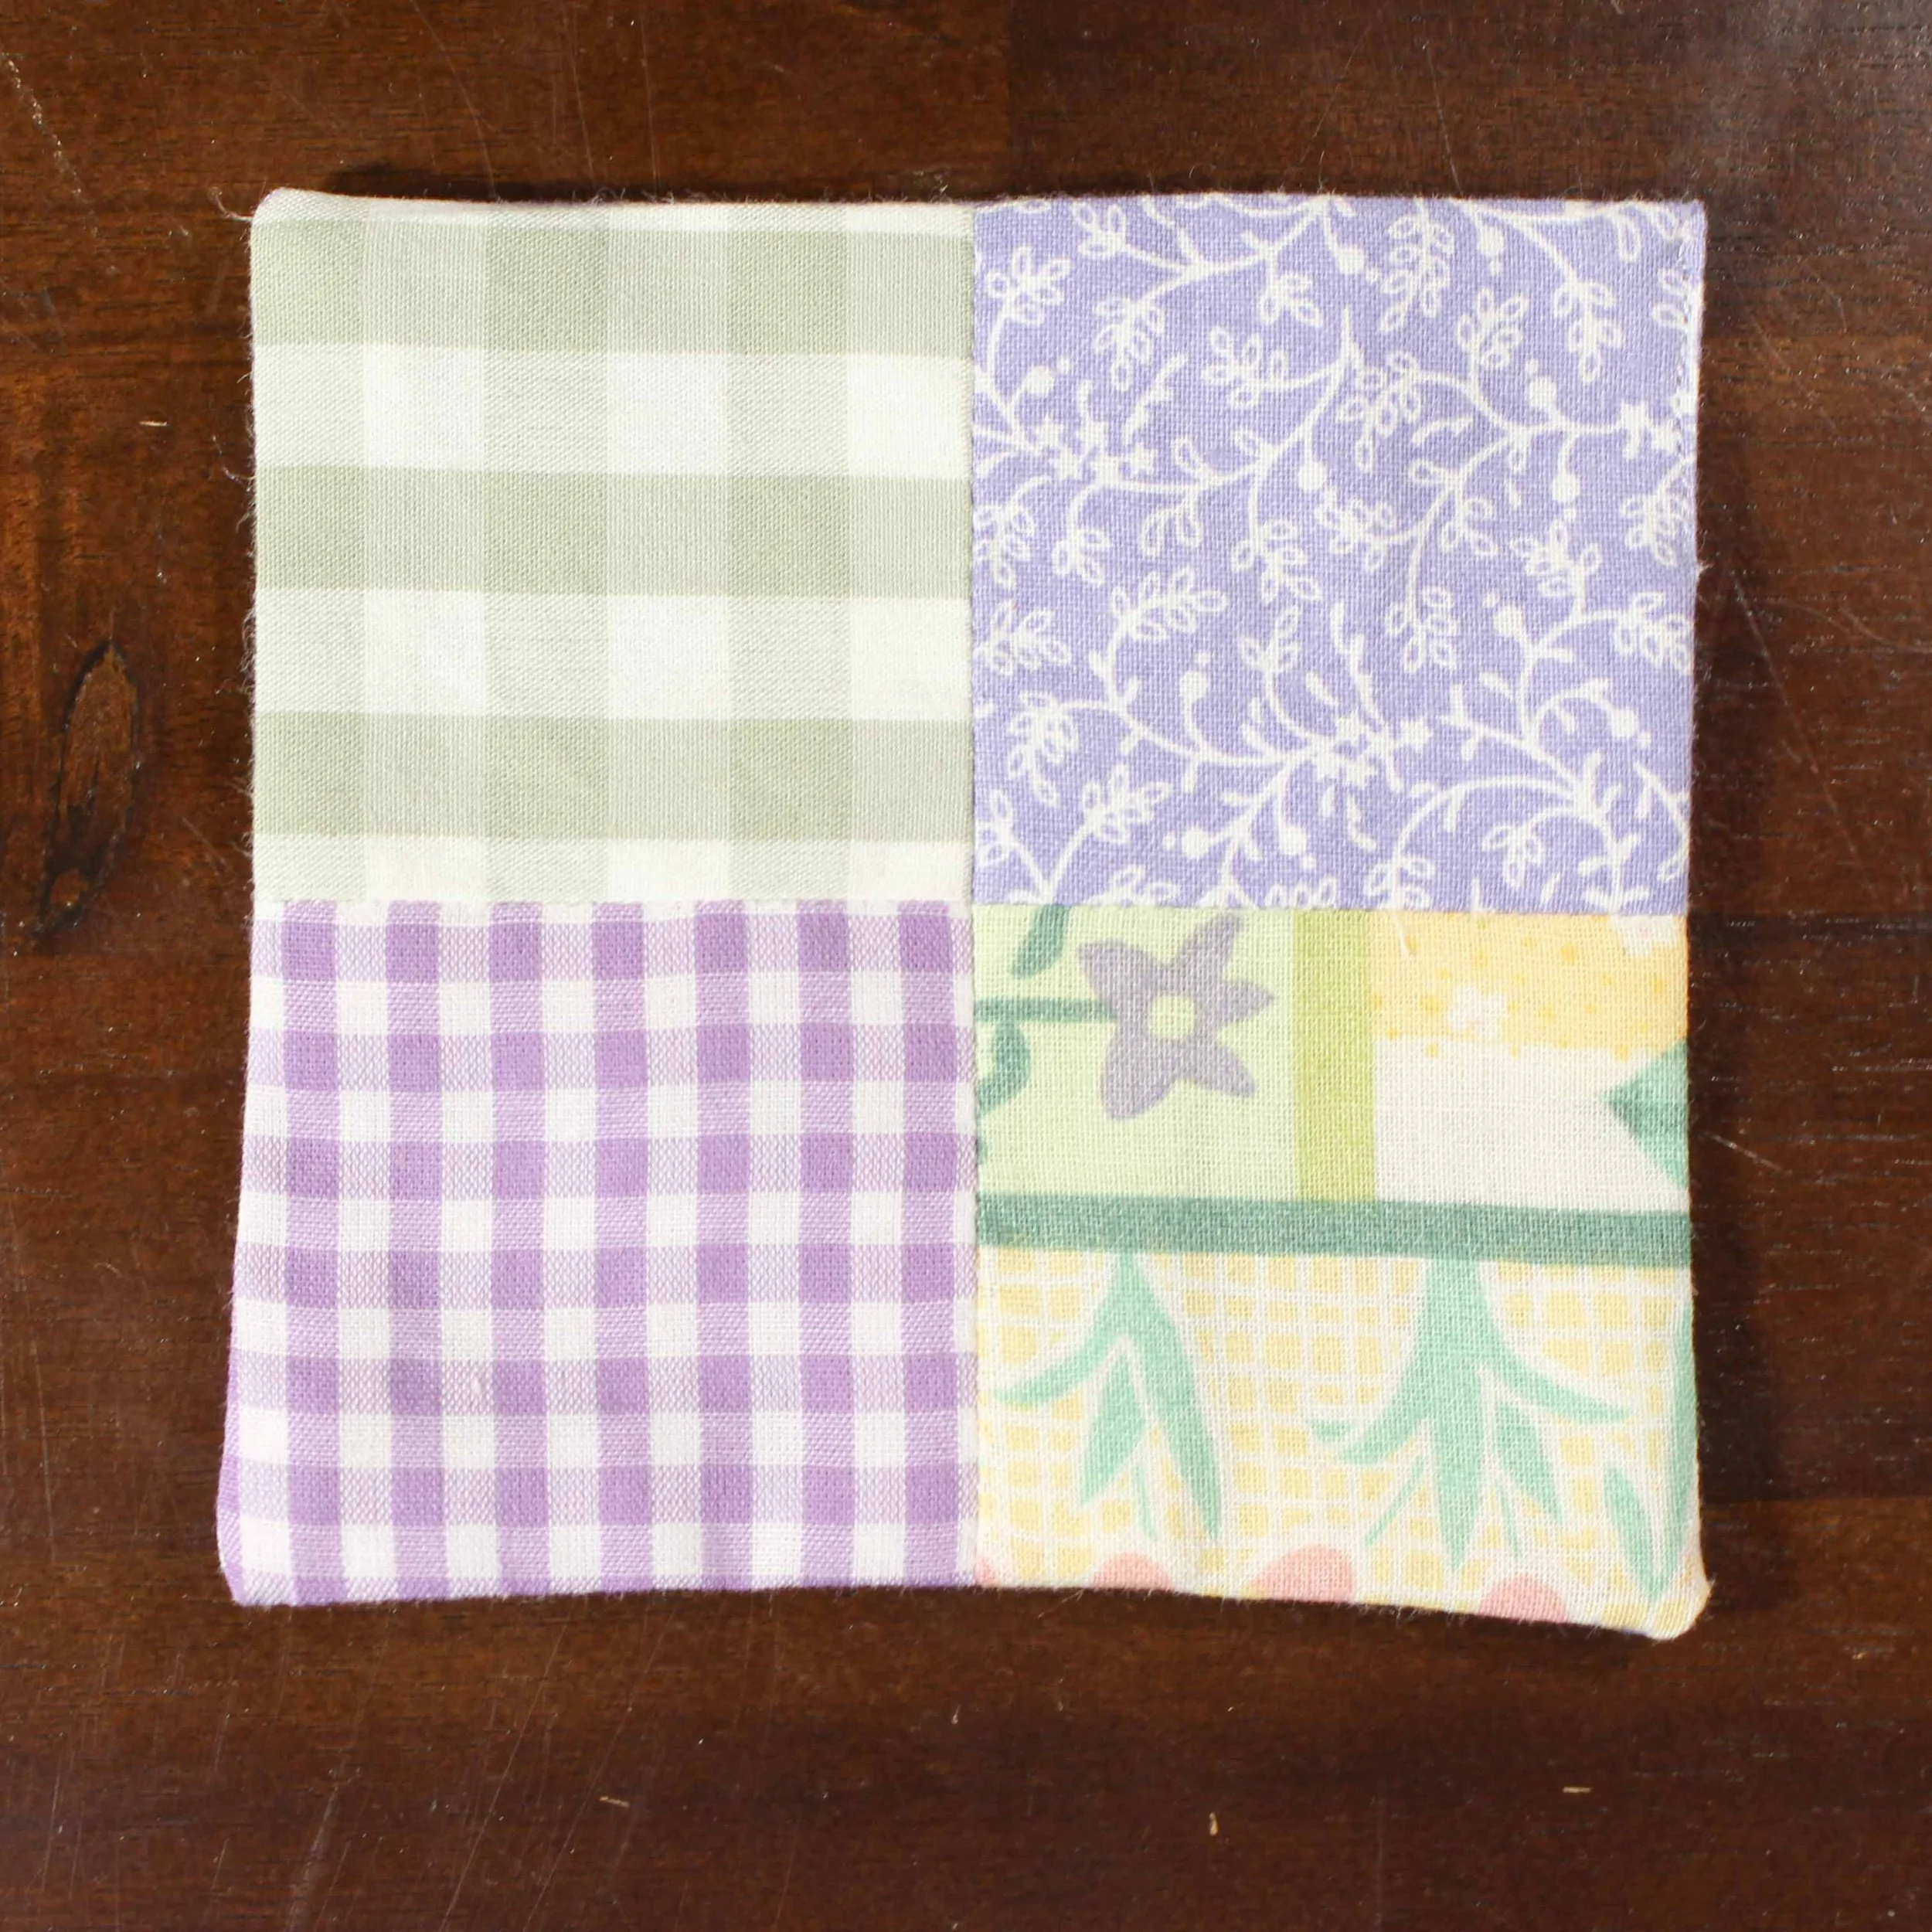
The Picnic Quilt Coaster has 5 pieces total — one large square for the backing, and four small squares for the quilt front.

Start by sewing together two of the smaller squares. Sew together colors 2 and 3 along one edge, with 0.5” seam allowance. Repeat this step for colors 1 and 4. Press seams open.

Now you have two rectangles. With right sides together, pin together along the long edge of the rectangle. Sew with 0.5” seam allowance and press open.
Now you have two squares — the backing square and the quilt front square. Pin these two squares together along all sides.

Sew squares together with 0.25” seam allowance, leaving a 1.5” gap.
Flip the coaster right side out using the 1.5” gap.
Tip: use a pencil tip to poke the corners out from the inside of the coaster. It will make them look nice and sharp.

Give your coaster a good press, making sure to line up the 1.5” gap so it looks clean.
Sew the 1.5” gap as close to the edge as possible. Press one final time, and you’re done!
patchwork denim quilted coaster
cutting instructions

Requirements: 3-5 fabric colors
Two backing pieces: two triangles, measuring 5.5” on the short sides, and 7.75” on the hypotenuse.
For the quilted front, cut up a bunch of smaller scraps. We’ll be sewing them together at random to create a scrappy front.
tutorial
The Patchwork Denim Quilt Coaster quilt front is create-your-own adventure. I’m not going to provide any accurate measurements for the scraps, because I didn’t use any! Just use whatever you have on hand, with a mix of small and large pieces. For the backing, you have two large triangles.
note: all seam allowances are 0.5” unless otherwise specified

Unlike the other quilted coasters, we are going to start by sewing the backing piece. Pin together the two large triangles along the hypotenuse and sew together. Once sewn, press open the seam so that it lays flat. From here on out, we’re going to be matching together scraps until we have a piece that matches the square we just created.

Start by matching up two of your smaller scrap pieces and sew along one edge. Repeat this step once or twice, so that you have several medium sized scrap pieces.

Match up your quilted medium sized pieces with a medium sized scrap, and sew together along one edge. Repeat a few times, until you have 1-2 large pieces.
Match up your large quilted pieces with a large sized scrap, and sew together along one edge. At this point, measure your quilt front against the backing we created in step 1. If your quilted piece is slightly too small, add scraps where it doesn’t quite match up to your square and sew together. You want to have this quilted piece slightly larger than the square. We’re going to cut it down before sewing.

Once your quilted piece matches your backing square, trim the edges so that both squares are the same size. Pin together and sew along all four sides, leaving a 1” gap along one seam. This gap leaves a hole that will allow us to flip the coaster right side out.
Clip all four corners. This will help make your corners sharp when you flip the coaster right side out, without fabric bunching up in the corners.
Using the 1” gap, flip your coaster so that the right side is facing out.
Tip: use a pencil tip to poke the corners out from the inside. It makes them look sharper!
Press the coaster, making sure to line up the 1” gap so it looks clean.

Sew the gap as close to the edge as possible. Press one final time, and you’re done!
more craft projects
If you have any questions about how to make quilted coasters, let me know in the comments and I’ll create an FAQ section on this page. Happy quilting!